Why x402 fits compliance workflows
Traditional KYC/AML verification often feels like a bureaucratic tollbooth. Users hit a hard wall, forced to upload documents and wait for manual review before they can access any service data. This friction is a major source of drop-off, especially in high-stakes environments where speed and privacy are paramount. The problem isn't that compliance is unnecessary; it's that the gatekeeping model is blunt and inefficient.
x402 offers a different approach by embedding payment enforcement directly into the protocol layer. Instead of a separate billing step after verification, or a vague promise of "free" services that monetize data later, x402 ensures that payment is settled before sensitive data is released. This aligns naturally with Anti-Money Laundering (AML) risk mitigation principles: you verify the source of funds and the identity of the payer simultaneously, reducing the attack surface for fraud.
For developers, this means shifting from building complex, error-prone webhook reconciliation systems to relying on a standard that guarantees settlement. When a request hits your endpoint, the protocol has already handled the financial side. This allows your compliance logic to focus on identity verification and risk scoring rather than chasing unpaid invoices or dealing with chargeback disputes.
The strategic value here is clarity. By treating the compliance check as a paid, verifiable transaction, you create an immutable audit trail that regulators appreciate. It’s not just about collecting fees; it’s about ensuring that every piece of sensitive data shared is tied to a verified, paying entity. This reduces the likelihood of bad actors exploiting free tiers to launder money or hide their identity.
Set up x402 payment middleware
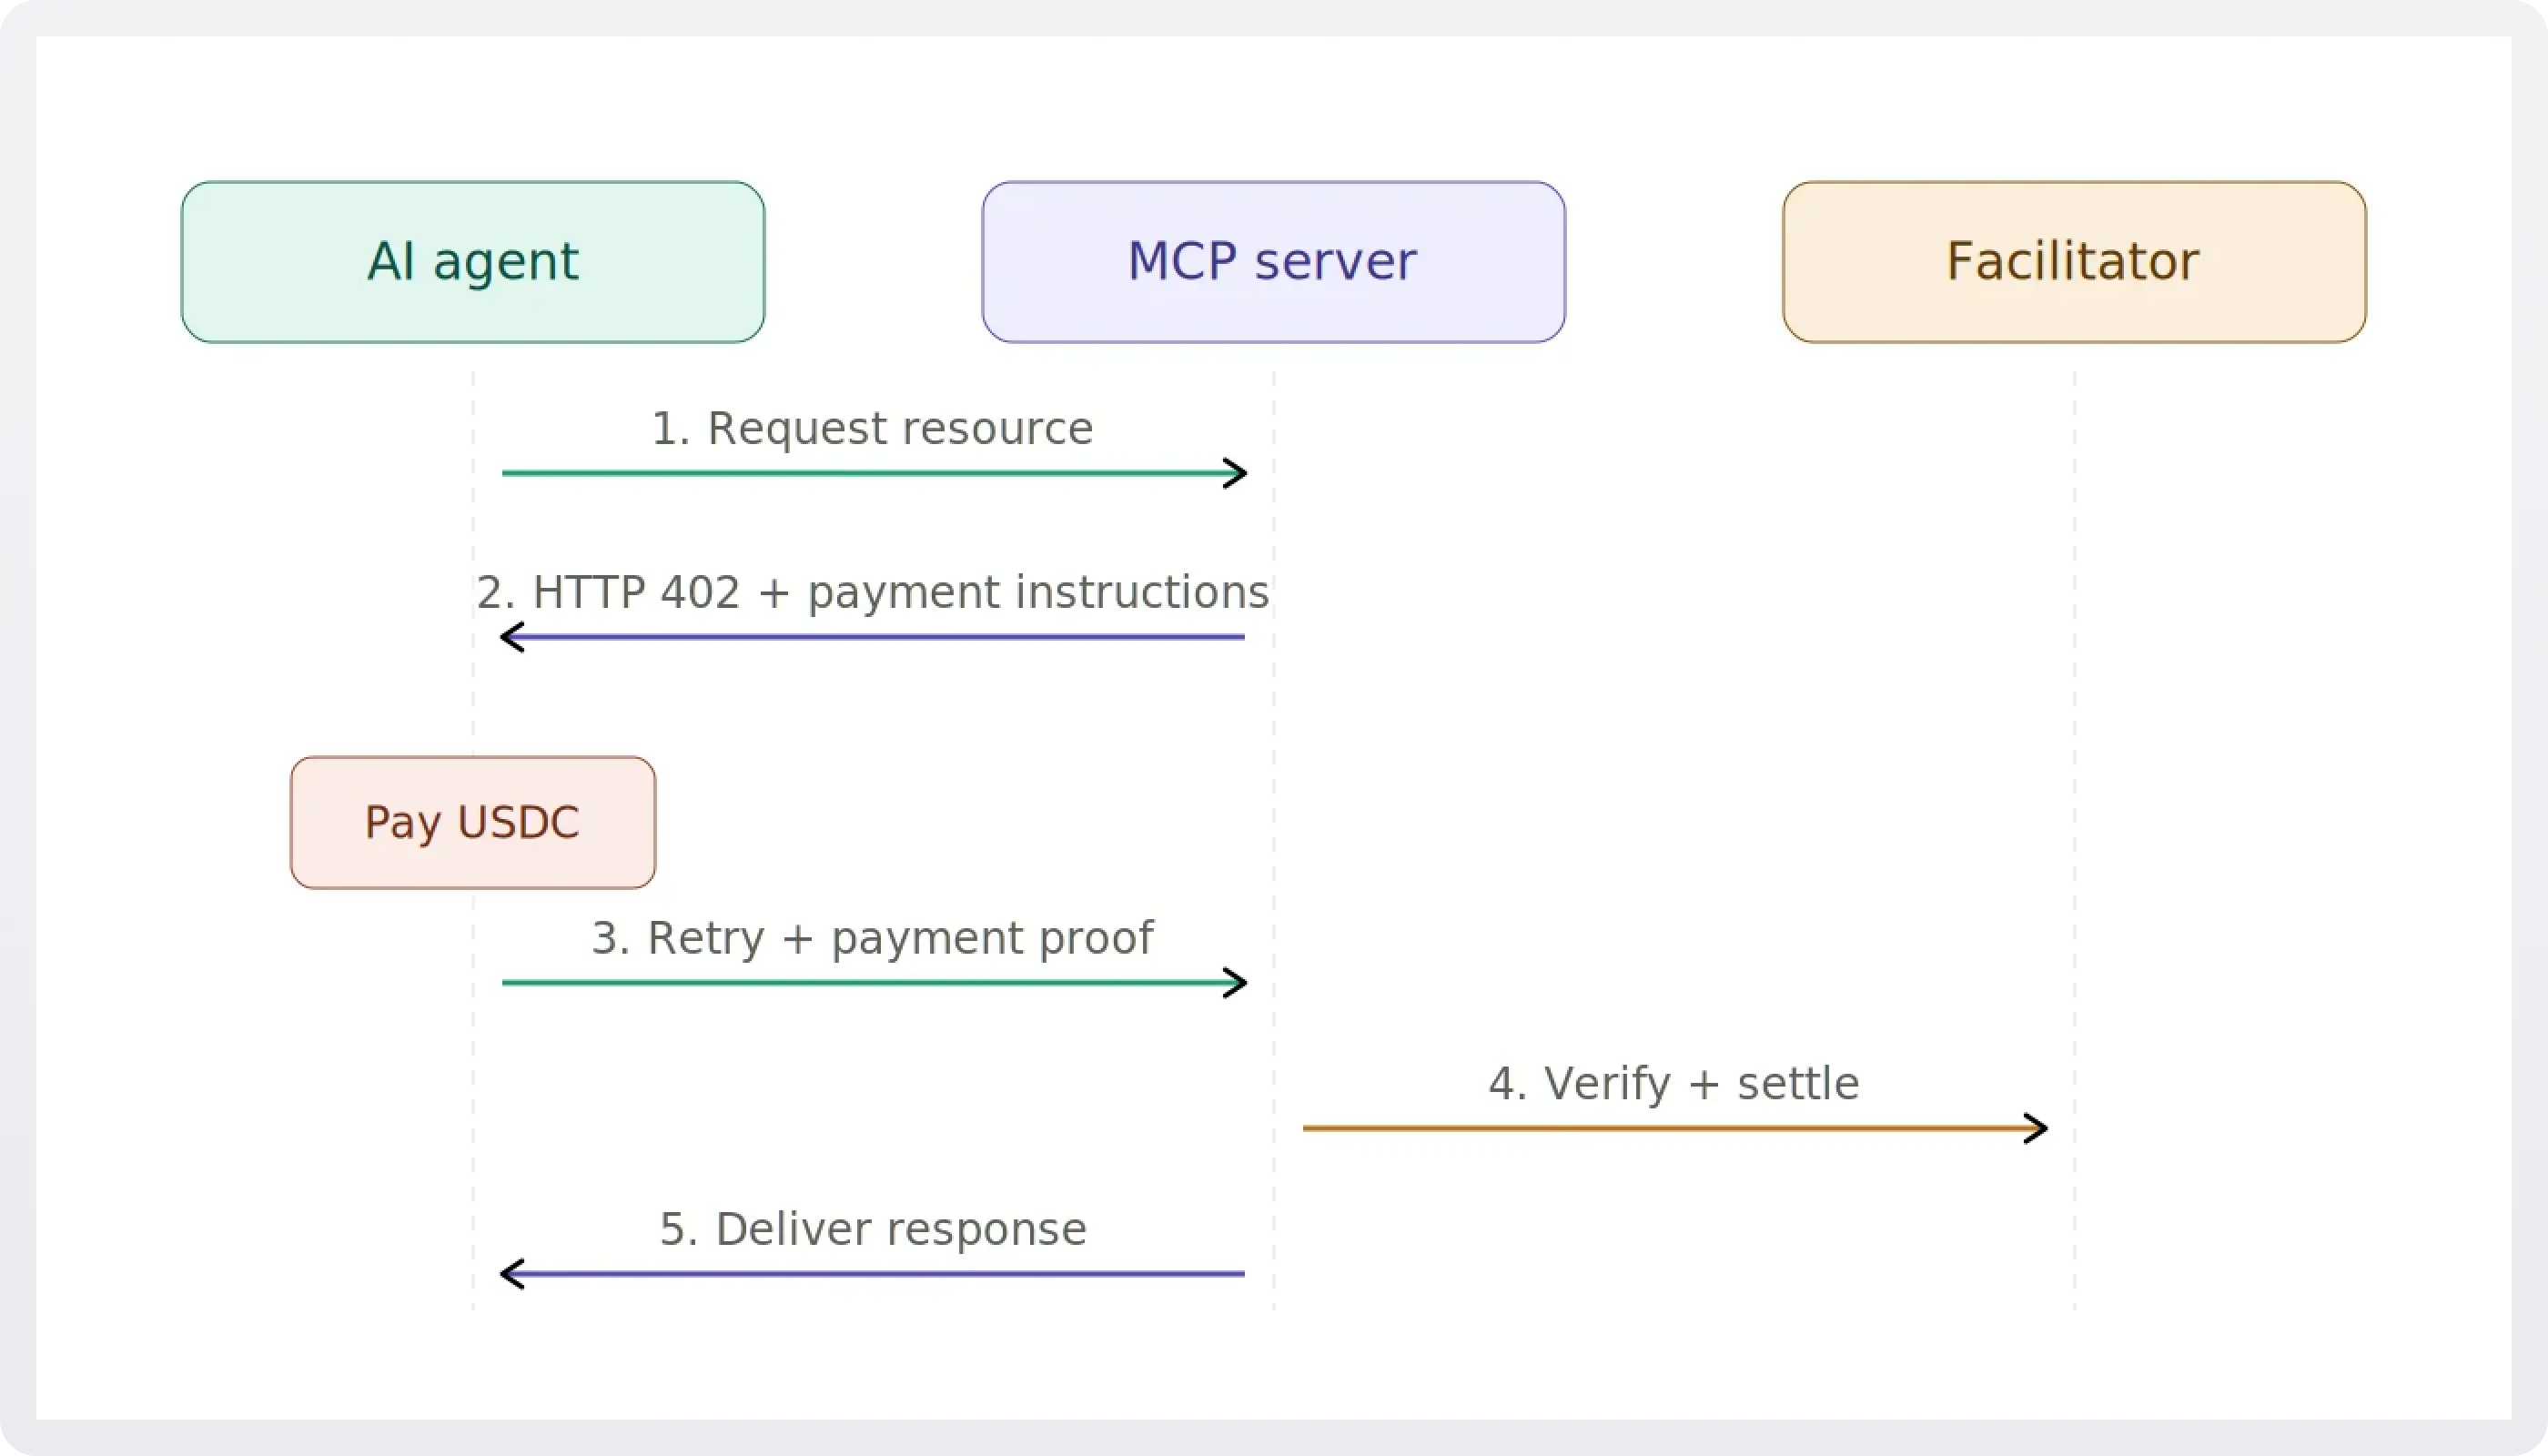
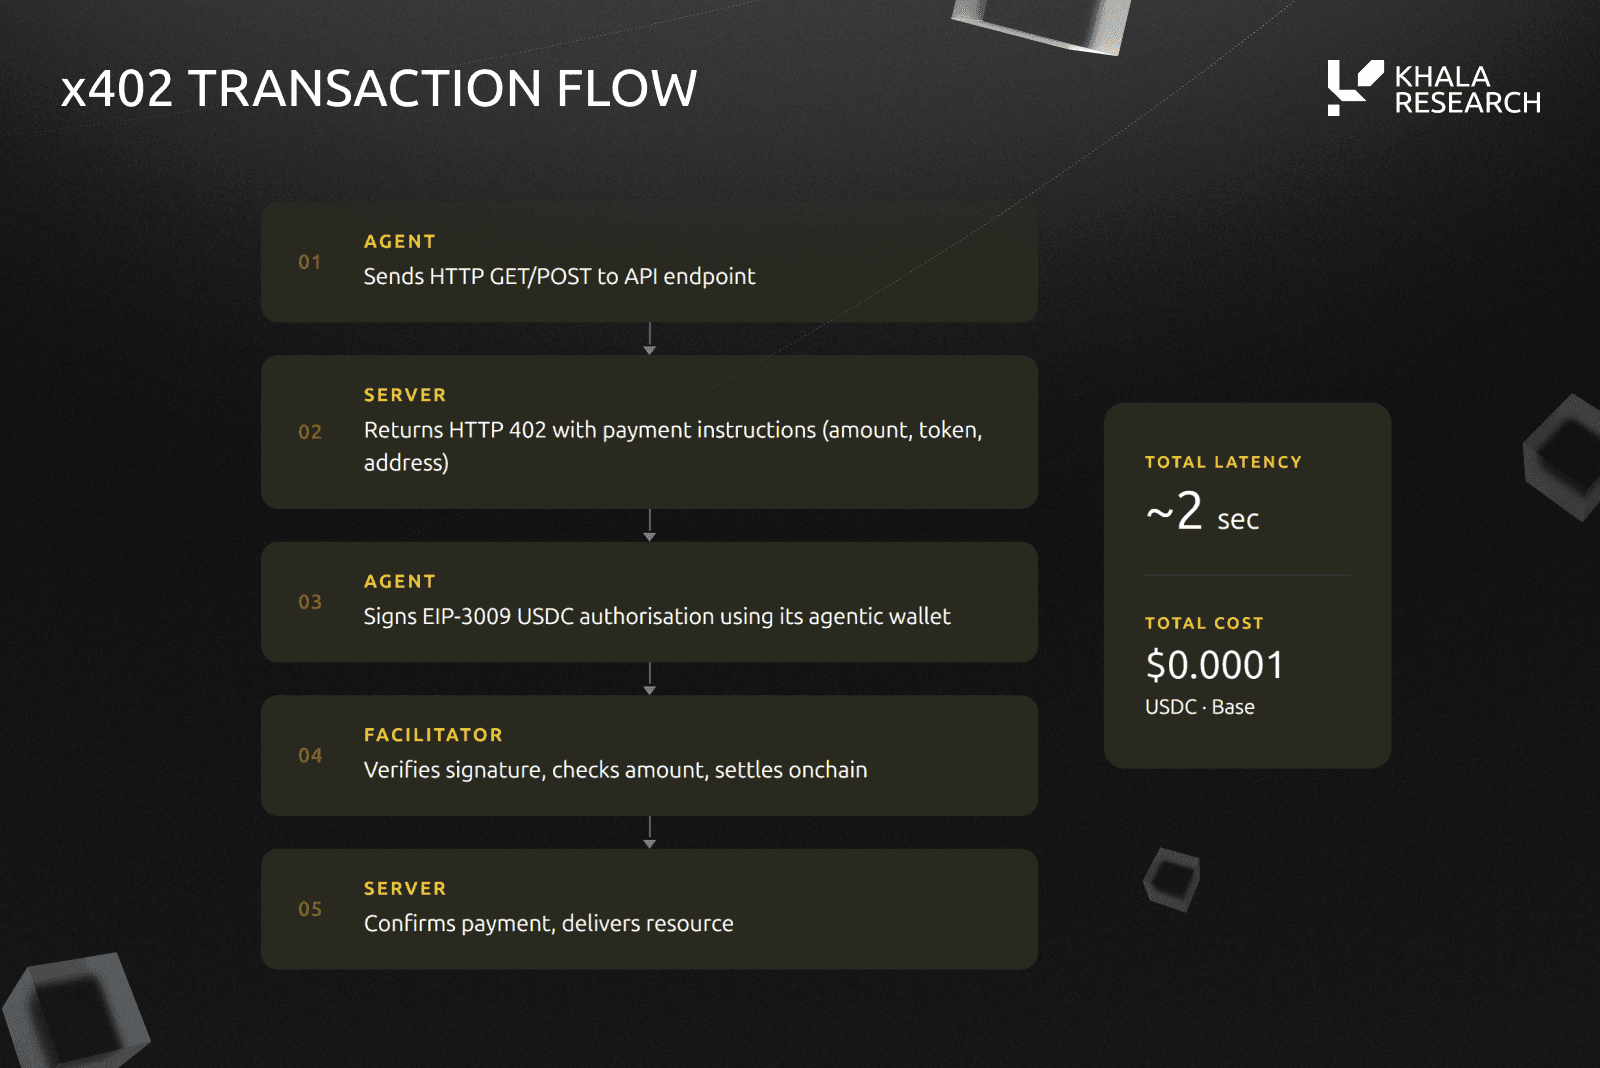
To route KYC or AML checks through an x402-enabled API, you must first install the necessary dependencies and set up the payment facilitator. This middleware acts as the gatekeeper, ensuring that compliance data is only released after a valid USDC transaction is confirmed. Without this setup, your API endpoints remain exposed to unauthorized access, creating significant regulatory risk.
Install the x402 SDK
Begin by adding the official x402 SDK to your project. This package provides the core utilities needed to handle cryptographic signatures and transaction verification. For most Node.js environments, you can install it via npm or yarn.
npm install @coinbase/x402
Once installed, import the SDK into your main server file. This gives you access to the X402Client class, which will manage the communication between your API and the blockchain network. Ensure you are using the latest version to benefit from the most recent security patches and protocol updates.
Configure the Payment Facilitator
Next, configure the payment facilitator to handle USDC transactions. You need to set up your wallet credentials and define the acceptable transaction thresholds. The facilitator will validate incoming requests, checking for the presence of a valid x402 signature before processing any sensitive KYC data.
const client = new X402Client({
  wallet: process.env.WALLET_PRIVATE_KEY,
  chainId: 137, // Polygon for lower fees
  currency: 'USDC'
});
Set the chainId to a network with low transaction fees, such as Polygon or Base, to ensure a smooth user experience. High gas fees on Ethereum mainnet can deter users from completing compliance checks. Define the currency as USDC, the standard stablecoin for these types of transactions, to avoid volatility issues during the verification process.
Validate Incoming Requests
Finally, implement middleware to validate incoming requests. This step ensures that every call to your KYC endpoints includes a valid payment signature. If the signature is missing or invalid, the middleware should reject the request immediately.
app.use('/api/kyc', async (req, res, next) => {
  try {
    await client.verifyPayment(req.headers['x-x402-payment']);
    next();
  } catch (error) {
    res.status(402).json({ error: 'Payment required' });
  }
});
This middleware function intercepts requests to the /api/kyc route. It calls verifyPayment with the signature found in the x-x402-payment header. If verification fails, it returns a 402 Payment Required status, forcing the client to settle the transaction before proceeding. This ensures that only paying users can access sensitive compliance data.
Structure payment schemes for access
KYC and AML checks are not one-size-fits-all. Your billing model should match your risk profile and volume. x402 supports two primary structures: exact (fixed) and upto (dynamic). Choosing the right one affects how you handle edge cases like false positives or high-risk flags.
Exact (Fixed) Pricing
Exact pricing sets a single, non-negotiable fee per check. This is best for standard, low-risk identity verifications where the outcome is binary. You know the cost upfront, and the API returns a definitive pass/fail. It’s simple to implement and predict.
Upto (Dynamic) Pricing
Upto pricing allows the endpoint to charge more if the check requires deeper investigation. If a customer triggers Enhanced Due Diligence (EDD), the cost increases to reflect the extra processing. This model aligns cost with risk, ensuring you don’t overpay for simple checks or underpay for complex ones.
| Feature | Exact (Fixed) | Upto (Dynamic) |
|---|---|---|
| Cost Predictability | High | Variable |
| Best For | Standard KYC | High-Risk/EDD |
| Implementation | Simple | Complex |
| Risk Alignment | Low | High |
Implementation Considerations
When building your x402 endpoint, consider the user experience. Exact pricing is transparent and builds trust for routine checks. Upto pricing requires clear communication to avoid surprise charges. Document your pricing logic in your API terms to ensure compliance with financial regulations.
Integrate KYC verification logic
Implementing the KYC/AML checks within an x402 endpoint requires treating the transaction not just as a payment, but as a compliance gate. The x402 protocol allows you to attach metadata to a transaction, which can include the necessary identifiers for regulatory verification. This approach ensures that the act of paying is inextricably linked to the act of verifying identity, creating a seamless flow for both the user and the compliance officer.
The end-to-end KYC process generally follows four stages: Customer Identification Program (CIP), Customer Due Diligence (CDD), Enhanced Due Diligence (EDD) for high-risk cases, and ongoing monitoring. In an x402 implementation, you must embed the logic for these stages directly into the endpoint's response mechanism. If the verification fails, the payment is withheld; if it passes, the transaction proceeds. This structure turns compliance from a post-hoc audit into a real-time requirement.
The first step is to define the minimum data set required for the Customer Identification Program. Your x402 endpoint should request specific fields such as legal name, date of birth, and government-issued ID numbers. These fields must be encrypted in transit and stored securely. The x402 transaction header can carry a hash of this data, allowing you to verify that the information hasn't been tampered with without exposing the raw data on the blockchain or public ledger.
Once identity is confirmed, you must assess the risk level through Customer Due Diligence. Integrate a risk-scoring algorithm that evaluates the user against sanctions lists and politically exposed person (PEP) databases. The x402 endpoint should return a dynamic response: if the risk score is low, the payment is approved immediately. If it is high, the endpoint triggers a hold, requiring manual review before the funds are released. This ensures that high-stakes transactions receive the necessary scrutiny.

For users flagged during CDD, implement an Enhanced Due Diligence (EDD) workflow. This step often requires additional documentation, such as proof of source of funds. Your x402 logic should pause the transaction and notify the compliance team. The endpoint can include a status code indicating "pending EDD," which prevents the user from proceeding until the review is complete. This prevents non-compliant actors from bypassing security measures through automated systems.
KYC is not a one-time event. Integrate a monitoring system that watches for changes in the user's risk profile or suspicious transaction patterns. The x402 endpoint should periodically re-verify identity data or trigger alerts if transaction behavior deviates from the norm. This ongoing monitoring is critical for maintaining regulatory adherence and avoiding severe penalties for non-compliance.
Verify the connection and monitor
Once your x402 endpoint is live, the work isn't done. You need to verify that the connection holds up under real conditions and monitor for any drift in compliance. Think of this as the final stress test before you hand over the keys to production.
Start by running a series of test transactions that mimic actual user behavior. Check that the endpoint correctly processes valid credentials and rejects invalid ones without leaking sensitive data. Use a tool like curl or a dedicated API tester to simulate these requests. Pay close attention to response times and error codes; anything unusual could signal a vulnerability or a misconfiguration.
Ongoing monitoring is equally critical. Set up alerts for any anomalies in transaction patterns or compliance checks. This includes tracking failed attempts, unusual IP addresses, or sudden spikes in volume. Regularly review these logs to ensure your endpoint remains aligned with current AML/KYC regulations. Non-compliance can lead to severe penalties, so staying vigilant is non-negotiable.
No comments yet. Be the first to share your thoughts!