Set up x402 payment middleware
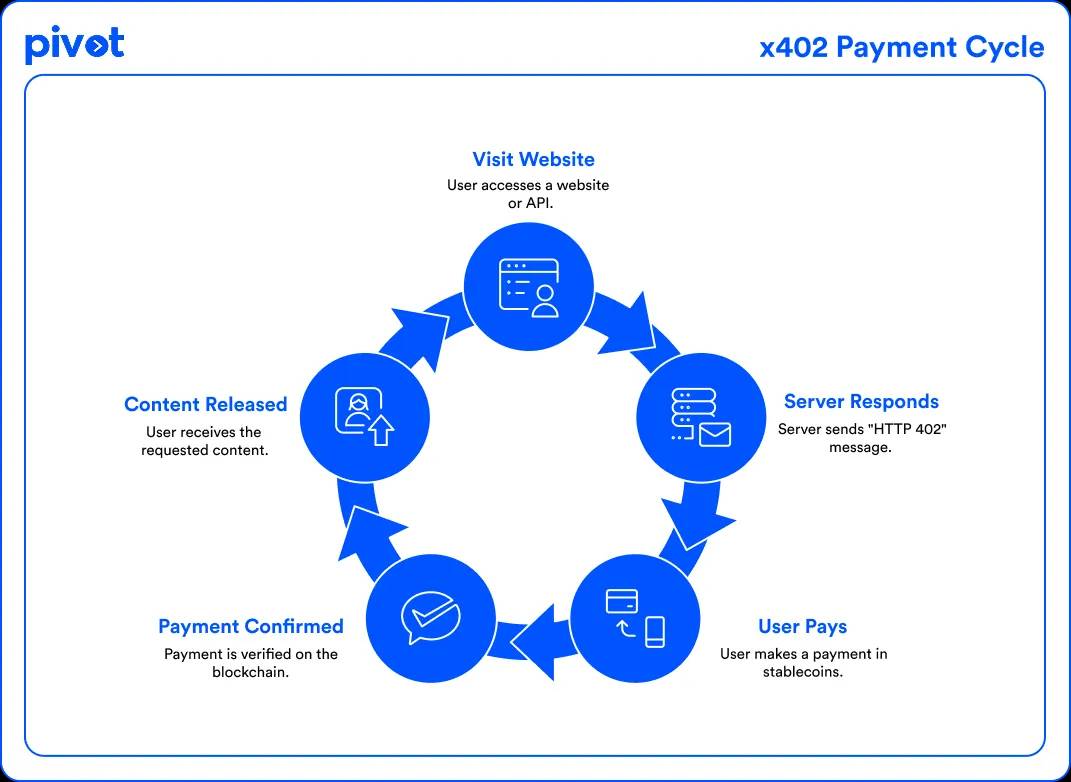
Before you can attach KYC or AML checks to your API, you need a working payment rail. The x402 protocol handles the crypto side of things, allowing your API to accept payments from buyers and AI agents without managing wallets or complex settlement logic yourself. Think of x402 as the toll booth that verifies payment before letting traffic reach your sensitive endpoints.
Start by installing the official x402 package for your backend environment. If you are using Node.js and Express, the Stellar docs provide a clear quickstart guide that walks you through the minimal setup required to get a paid API running. This initial configuration ensures your server can recognize x402 headers and process incoming transactions correctly.
Once the middleware is installed, configure your API to listen for the specific x402 payment headers. This step is critical because it establishes the foundation for all subsequent compliance layers. Without a functioning payment flow, your KYC checks will have no context or trigger mechanism. You are essentially building the engine before adding the safety features.
After the basic middleware is active, you can move on to integrating the compliance logic. This ensures that every request hitting your API has not only paid for the service but also passed the necessary identity verification. The order matters: payment infrastructure first, then regulatory checks.
Run the package manager command for your environment (e.g., npm install @coinbase/x402). This adds the necessary dependencies to your project, enabling your server to parse x402-specific headers and interact with the settlement layer.
Import the middleware into your Express app and mount it on your API routes. This intercepts incoming requests, checking for valid x402 payment signatures before allowing the request to proceed to your business logic. This is where the "toll booth" effect happens.
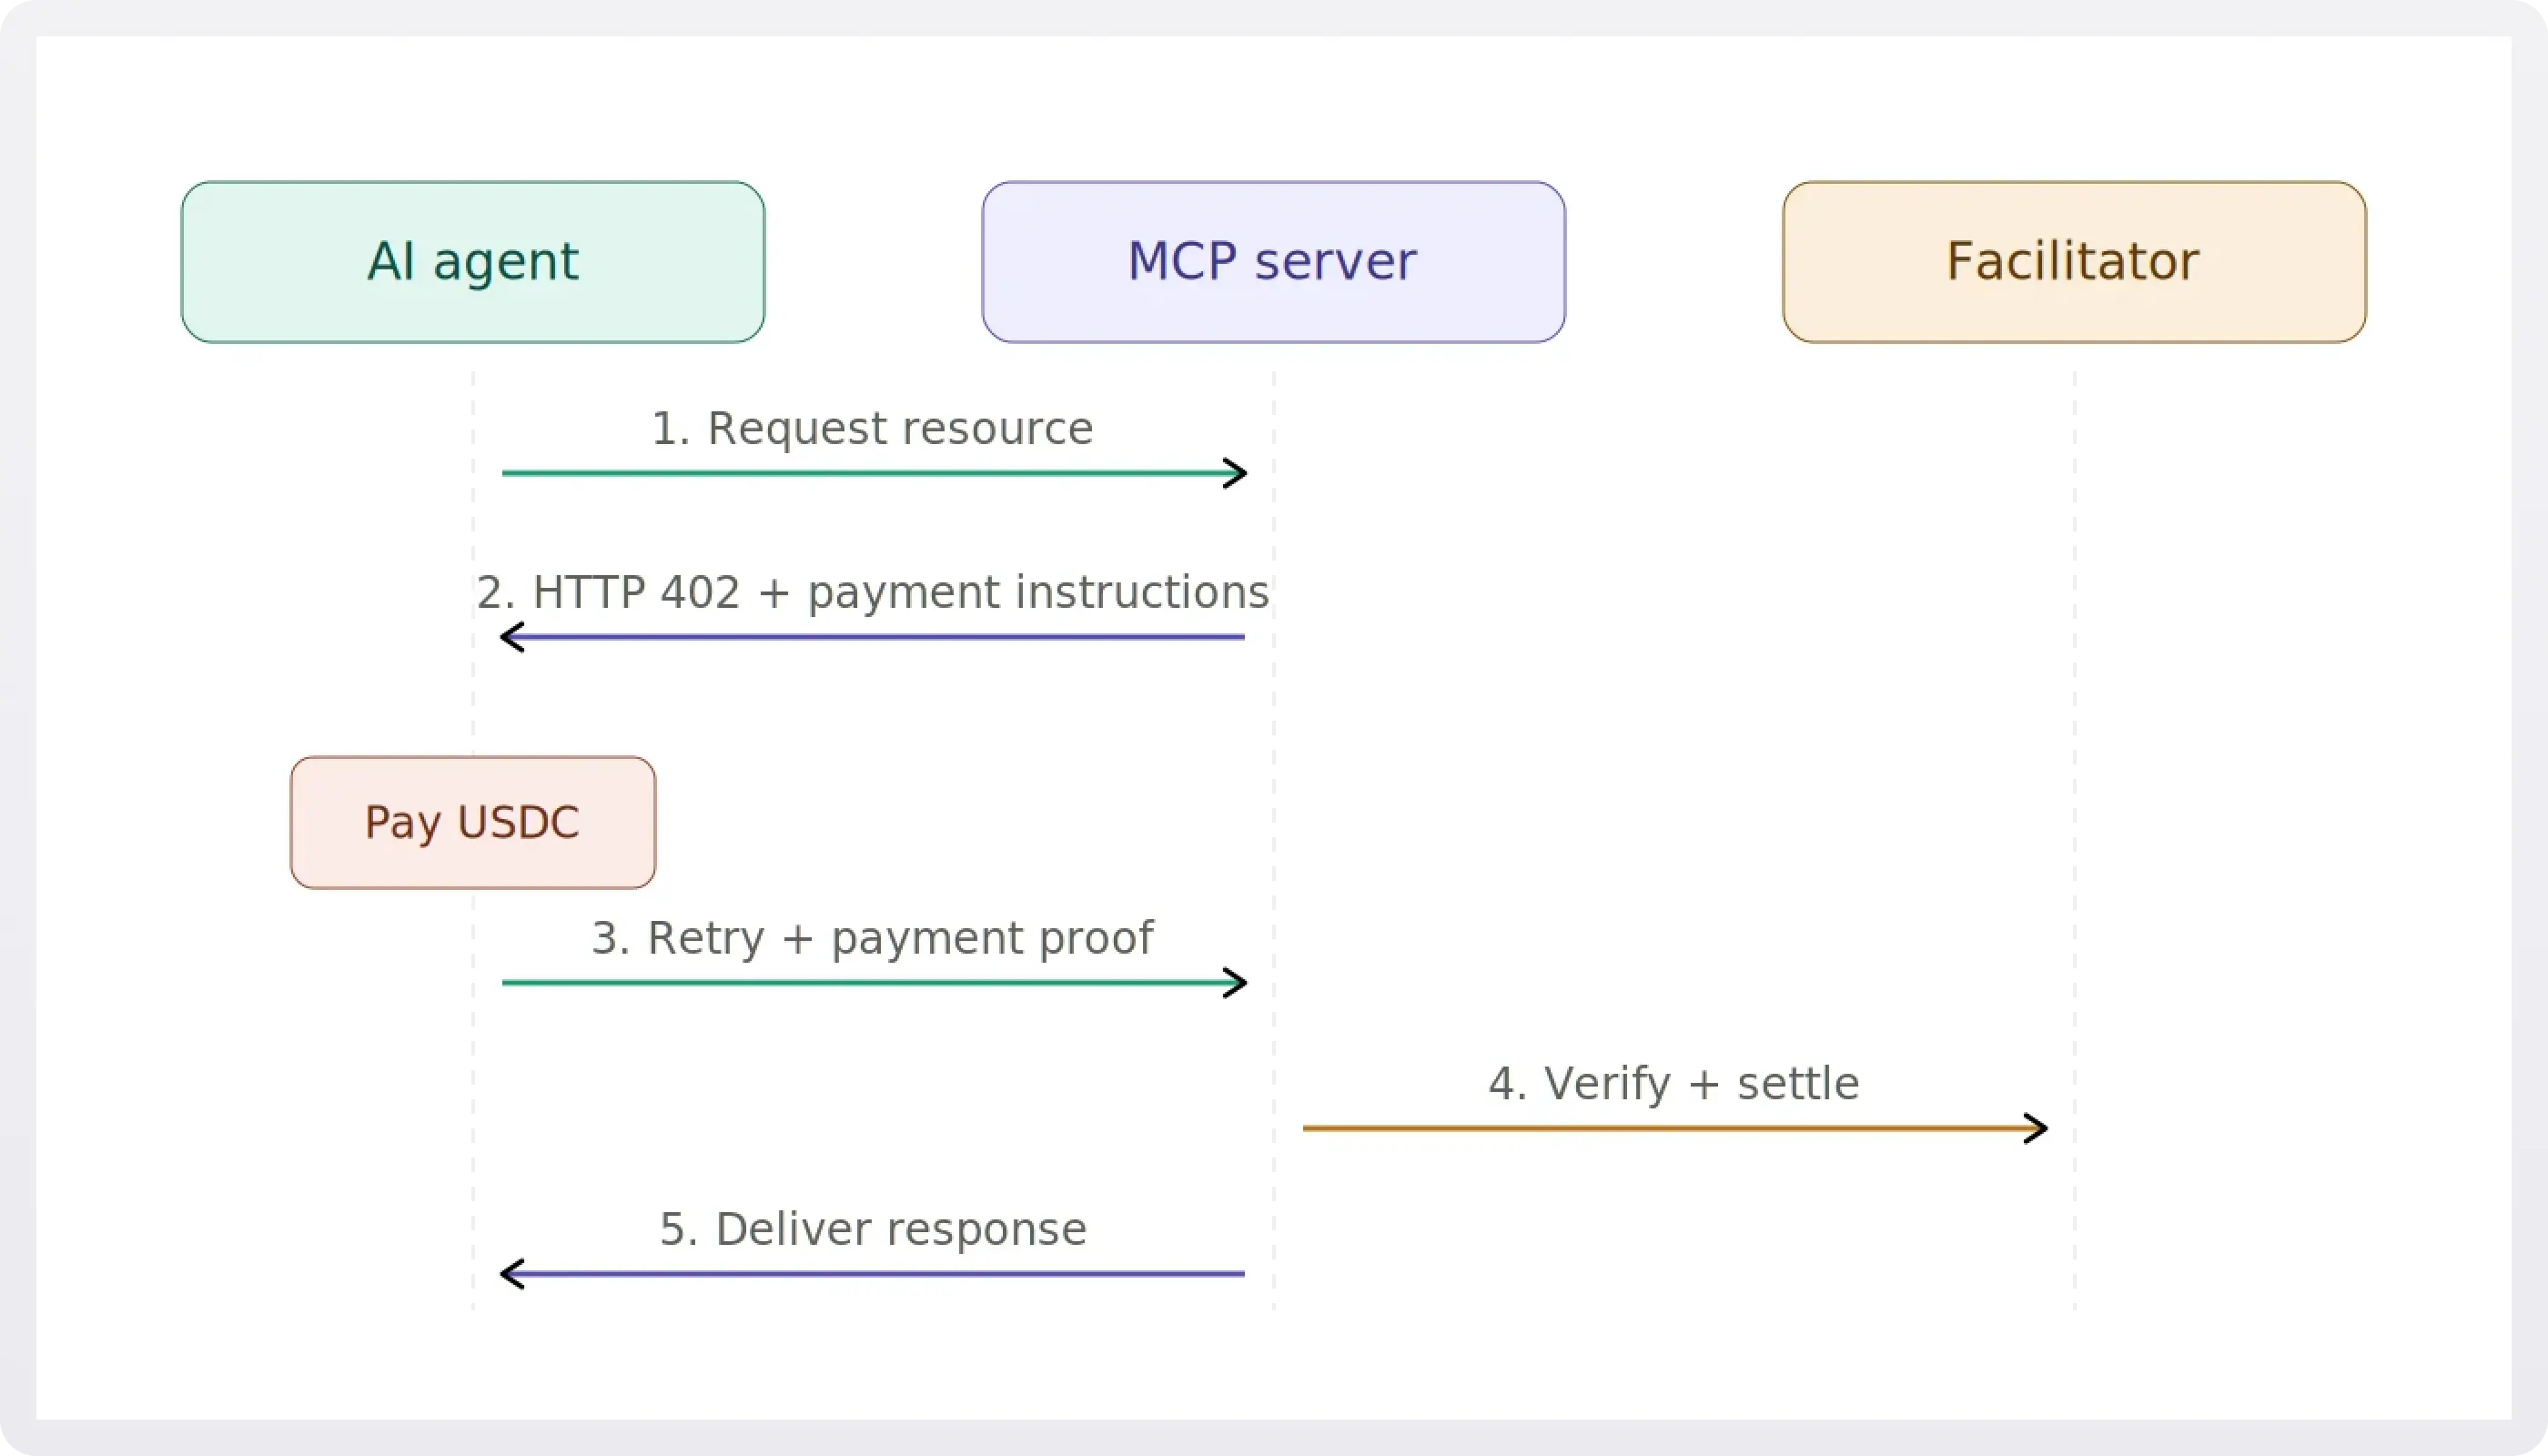
Test the integration by sending a test payment. Ensure the transaction settles correctly on the blockchain and that your API returns a success response only after payment confirmation. This validates that your payment rail is robust enough to handle real-world traffic before adding KYC/AML complexity.
With the payment middleware running, your API is now equipped to handle crypto transactions. The next step is to layer on the KYC/AML checks, ensuring that only verified users can access your protected endpoints.
Embed identity verification in your x402 endpoint handler
You can run KYC/AML checks directly inside the payment flow without breaking the user experience. Instead of treating compliance as a separate administrative step, you gate financial access behind verified identity at the moment of transaction.
This approach aligns with the four pillars of KYC—Customer Acceptance Policy, Customer Identification Procedures, Transaction Monitoring, and Risk Management—by embedding verification into the code that handles the payment request. The x402 protocol allows you to verify identity before the payment token is issued, ensuring that only compliant users can access financial services.
Step 1: Define the verification trigger
Identify the specific transaction types that require identity checks. Not every interaction needs a full KYC review, so define clear thresholds based on risk. For example, high-value transfers or new user onboarding should trigger immediate verification, while low-risk recurring payments might only need periodic checks.
Step 2: Integrate the KYC API call
Within your endpoint handler, add a synchronous or asynchronous call to your KYC provider. This call should happen before you generate the payment token. If the identity check fails, return a specific error code that tells the client to prompt the user for verification documents. This keeps the flow transparent and prevents failed transactions from appearing as technical errors.
Step 3: Handle verification states
Your endpoint must handle three states: verified, pending, and failed. For verified users, proceed with the payment. For pending users, you might allow limited access while they complete the process. For failed users, block the transaction and log the event for compliance reporting. This logic ensures that your system remains compliant without disrupting legitimate users.
Step 4: Log compliance data securely
Every verification attempt must be logged with a timestamp, user ID, and outcome. These logs are critical for audits and regulatory reviews. Ensure that you are storing this data in a secure, encrypted manner that complies with data privacy regulations. Remember, the goal is to verify identity without exposing sensitive personal information unnecessarily.
Step 5: Test with sandbox environments
Before going live, test your integration with your KYC provider’s sandbox. Simulate various scenarios, including successful verifications, document rejections, and network timeouts. This ensures that your error handling is robust and that your users have a smooth experience even when issues arise.
Structure payment schemes for access
When integrating KYC/AML checks into x402 endpoints, your billing model dictates how you manage cash flow and scale. The two primary approaches are fixed-price per check and dynamic volume-based pricing. Choosing the right one depends on your transaction volume and risk tolerance.
Fixed-Price Billing
Fixed pricing charges a set amount for every identity verification, regardless of how many checks you process. This model offers predictable costs, making it easier to budget for smaller startups or low-volume services. You pay for the verification, not the complexity of your user base.
Volume-Based Billing
Volume-based pricing scales with your usage, often offering tiered discounts as you process more checks. This model is ideal for high-growth platforms where user acquisition spikes unpredictably. You only pay for what you use, reducing upfront financial risk during early stages.
Comparison of Billing Models
The table below outlines the key differences between fixed and volume-based billing structures for KYC services.
| Feature | Fixed-Price | Volume-Based |
|---|---|---|
| function fixed() { [native code] } | ||
| function fixed() { [native code] } | ||
| function fixed() { [native code] } | ||
| function fixed() { [native code] } |
Handle high-risk industry requirements
x402 Endpoints for KYC/AML Checks works best as a clear sequence: define the constraint, compare the realistic options, test the tradeoff, and choose the path with the fewest hidden costs. That order keeps the advice usable instead of decorative. After each step, pause long enough to check whether the recommendation still fits the reader's actual situation. If it depends on perfect timing, unusual access, or a best-case budget, include a simpler fallback.
The simplest way to use this section is to write down the real constraint first, compare each option against it, and choose the path that still works outside ideal conditions.
Verify compliance with the four pillars
Your x402 endpoint must enforce the four core pillars of KYC/AML to ensure regulatory adherence. These pillars—Customer Acceptance, Customer Identification, Transaction Monitoring, and Risk Management—form the baseline for any compliant financial workflow.
Customer Acceptance Policy (CAP)
Before processing any transaction, your endpoint must verify that the customer relationship is permissible under your institution’s risk appetite. This step prevents onboarding high-risk entities or prohibited jurisdictions at the source.
Customer Identification Procedures (CIP)
Next, validate the user’s identity against official records. As noted by compliance experts, this is the first step in KYC/AML verification. Your x402 implementation should require verified identity data (e.g., government ID hashes) before granting access to sensitive endpoints.
Transaction Monitoring
Implement real-time monitoring to detect unusual patterns. Your endpoint should flag anomalies—such as rapid, high-value transfers—immediately. This ongoing surveillance is critical for identifying potential money laundering activities after the initial onboarding.
Risk Management
Finally, apply dynamic risk scoring. Assign risk levels based on customer profile, geography, and transaction history. Your x402 service should adjust access controls or require enhanced due diligence (EDD) for high-risk interactions, ensuring a robust defense against financial crime.

Common questions about x402 KYC
Integrating identity verification into your x402 endpoints shifts compliance from a post-transaction audit to a real-time gate. Below are the specific questions developers and compliance officers ask most often when building these systems.
No comments yet. Be the first to share your thoughts!