Set up the x402 payment layer
Before you can perform any KYC or AML checks, you need a reliable way to ensure the client has paid for the service. The x402 protocol handles this by attaching payment requirements directly to your API endpoints. Instead of building custom billing logic or managing third-party payment gateways, you define the cost in the API specification itself.
This approach creates a clean separation of concerns: the payment layer handles the transaction, while your application logic focuses on verification. By integrating x402 first, you ensure that no verification request is processed until the associated fee is settled on-chain. This is especially important for high-stakes compliance workflows where preventing unauthorized access is critical.
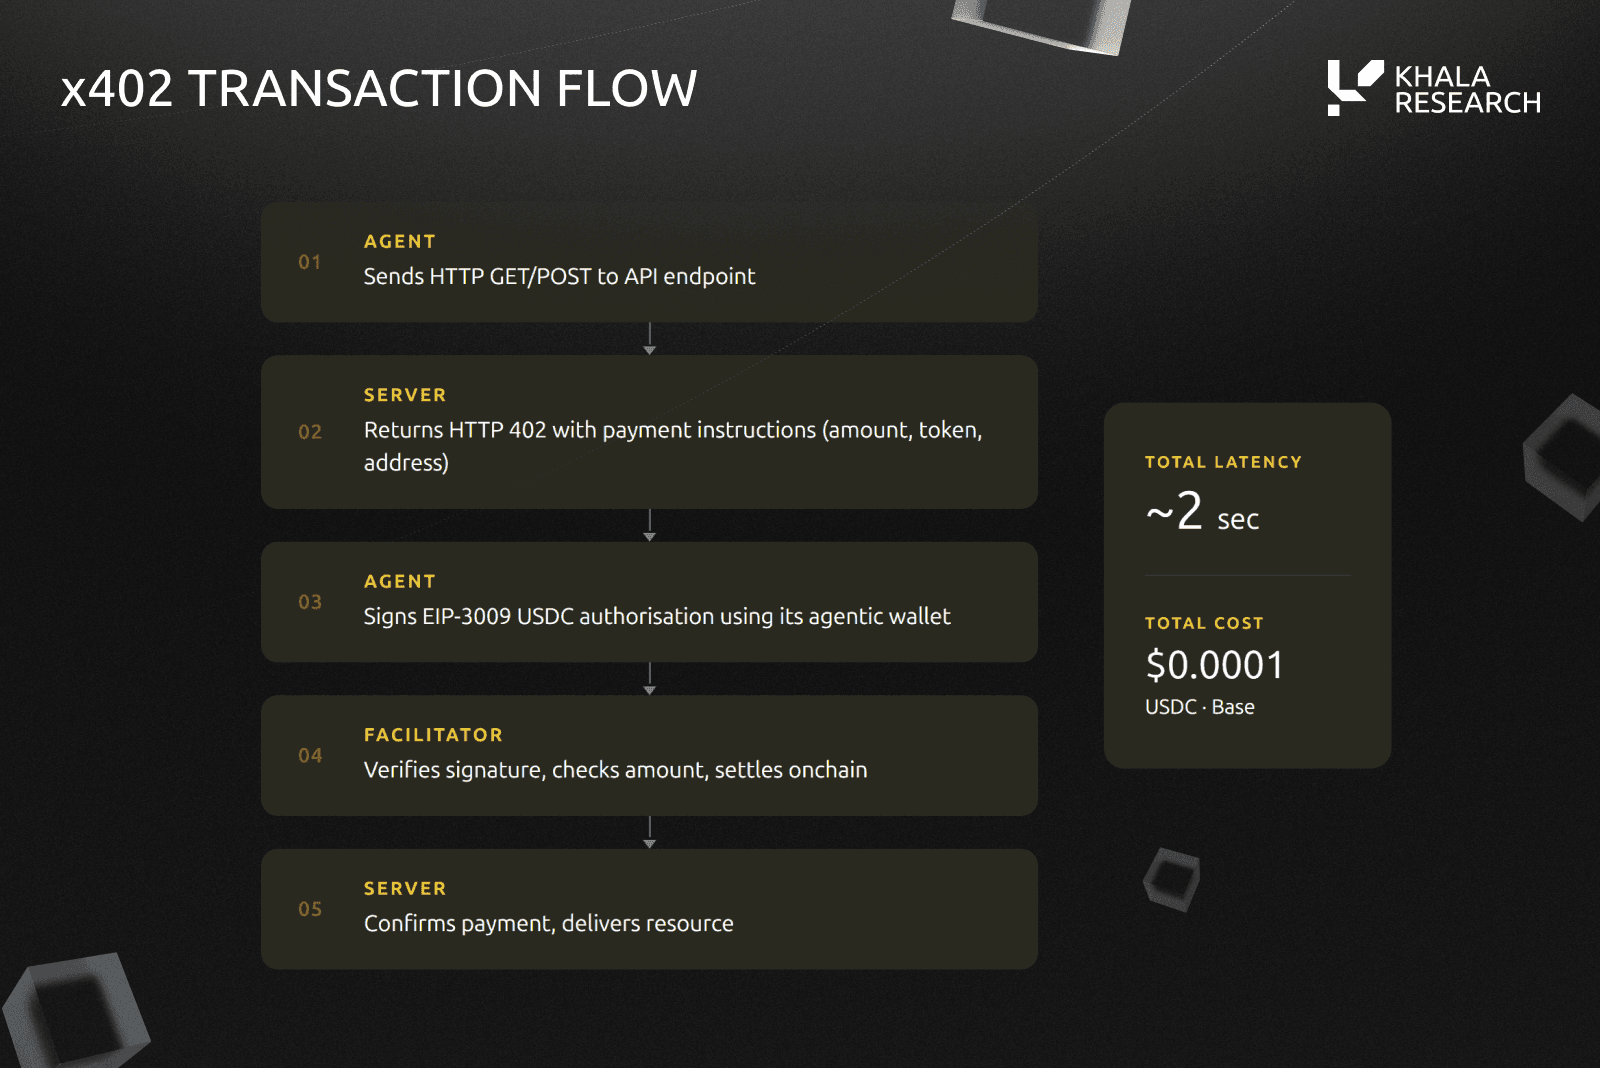
Start by identifying the API route that triggers the KYC or AML check. In your API specification (OpenAPI or similar), add the x402 header to define the required payment. This tells the client exactly how much they need to pay before the endpoint returns any data. You can set a fixed amount or use dynamic pricing based on the complexity of the check.

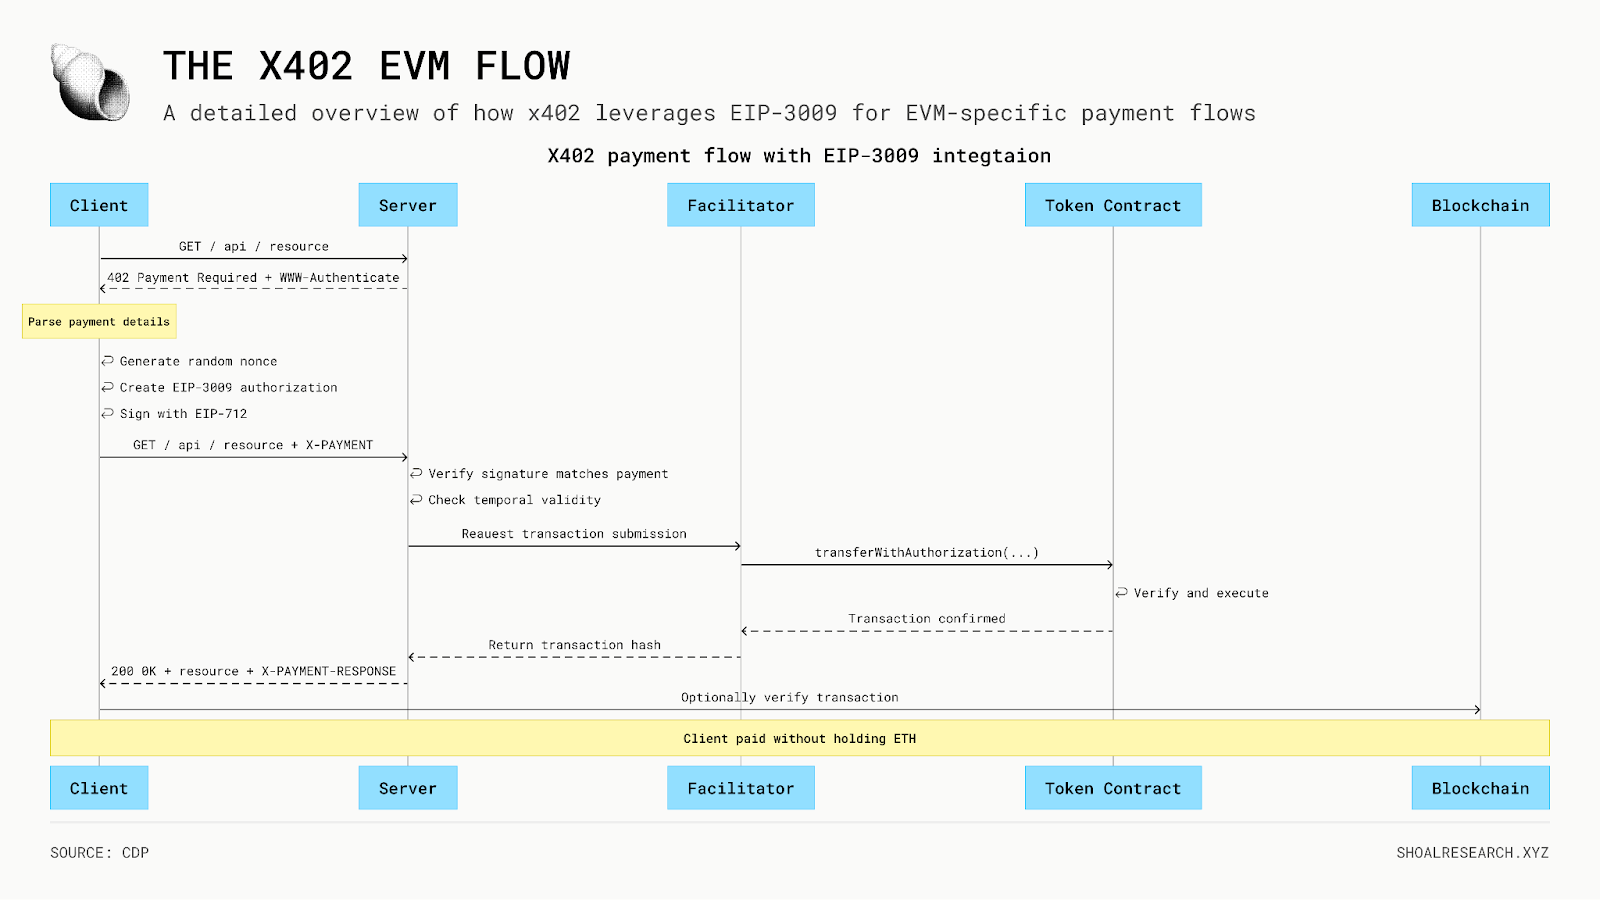
Next, add middleware to your server that intercepts incoming requests. This middleware checks for the x-payment header, which contains the signed payment payload. The payload is signed by the buyer and must be verified against the on-chain settlement. If the payment is valid and settled, the request proceeds. If not, the server returns a 402 Payment Required error.
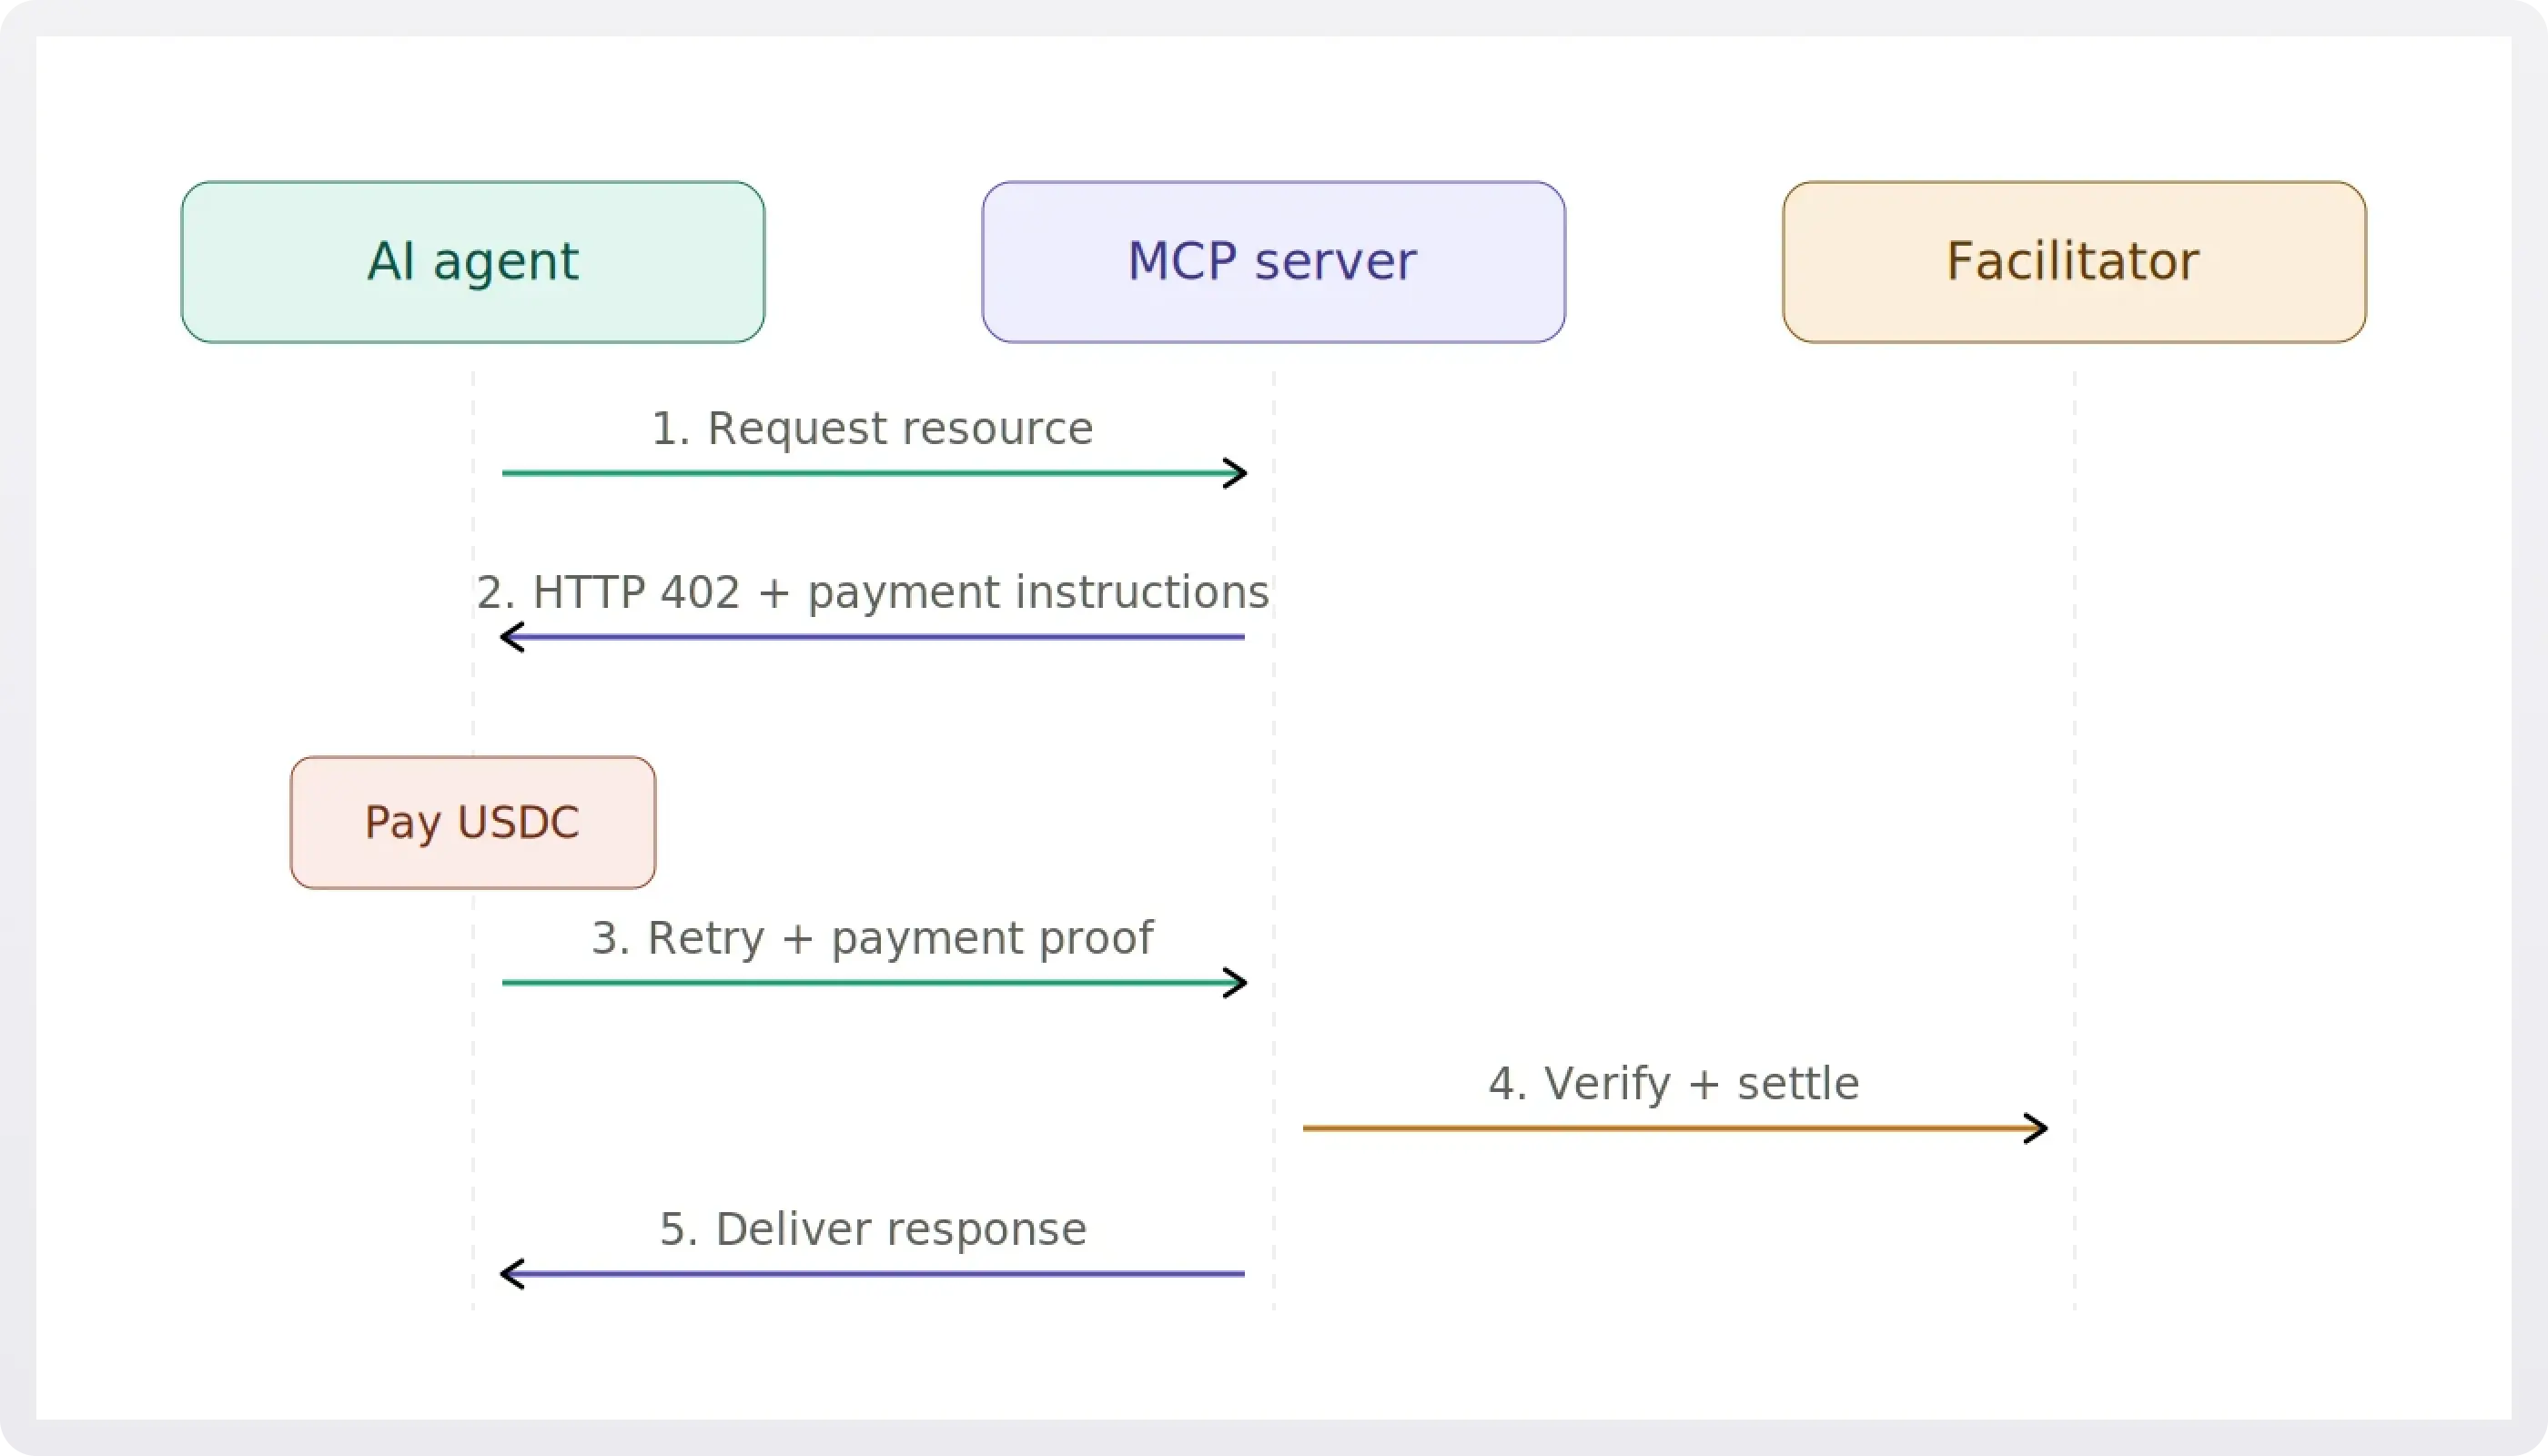
Once the payment is verified, your API can safely proceed with the KYC or AML check. Since the payment is already settled on-chain, you don't need to worry about chargebacks or payment failures during the verification process. This allows your compliance team to focus on the actual identity checks without managing billing disputes.
By following these steps, you create a robust foundation for your compliance workflow. The x402 protocol ensures that every request is backed by a real payment, reducing the risk of fraudulent or unauthorized access to your verification services. For more details on how the payment payload is structured and verified, refer to the x402 documentation.
Integrate KYC verification APIs
Connecting identity verification services to your x402-gated endpoint ensures that only verified users access sensitive data. This integration acts as a digital tollbooth, allowing traffic only after the necessary checks are passed.

Start by choosing a provider that supports the specific identity documents your users will present. Look for APIs that offer real-time verification and AML screening capabilities. Official sources like Fenergo emphasize that compliance involves verifying identities and assessing risk continuously.
Set up a webhook on your x402 endpoint to receive status updates from the KYC provider. This webhook should listen for verified, pending, or rejected events. When a verified event arrives, trigger the x402 payment flow to grant access to the protected resource.
If the KYC check fails or times out, return a specific HTTP error code that your client can interpret. Provide clear instructions to the user on how to resubmit documents. Avoid locking the user out indefinitely; instead, allow retries within a set timeframe.
Implement AML screening logic
x402 Endpoints for KYC/AML Checks works best as a clear sequence: define the constraint, compare the realistic options, test the tradeoff, and choose the path with the fewest hidden costs. That order keeps the advice usable instead of decorative. After each step, pause long enough to check whether the recommendation still fits the reader's actual situation. If it depends on perfect timing, unusual access, or a best-case budget, include a simpler fallback.
The simplest way to use this section is to write down the real constraint first, compare each option against it, and choose the path that still works outside ideal conditions.
Audit your compliance workflow
x402 Endpoints for KYC/AML Checks works best as a clear sequence: define the constraint, compare the realistic options, test the tradeoff, and choose the path with the fewest hidden costs. That order keeps the advice usable instead of decorative. After each step, pause long enough to check whether the recommendation still fits the reader's actual situation. If it depends on perfect timing, unusual access, or a best-case budget, include a simpler fallback.
The simplest way to use this section is to write down the real constraint first, compare each option against it, and choose the path that still works outside ideal conditions.
Common kyc and aml: what to check next
x402 Endpoints for KYC/AML Checks works best as a clear sequence: define the constraint, compare the realistic options, test the tradeoff, and choose the path with the fewest hidden costs. That order keeps the advice usable instead of decorative. After each step, pause long enough to check whether the recommendation still fits the reader's actual situation. If it depends on perfect timing, unusual access, or a best-case budget, include a simpler fallback.
The simplest way to use this section is to write down the real constraint first, compare each option against it, and choose the path that still works outside ideal conditions.
Helpful gear
Use these product recommendations as a starting point, then choose the size, material, and price point that fit how you actually use the gear.

As an Amazon Associate, we may earn from qualifying purchases.
No comments yet. Be the first to share your thoughts!