Set up x402 payment middleware
Before you can enforce any compliance checks, your API needs a way to accept payment for access. The x402 standard replaces traditional API keys with a simple HTTP 402 response: if the client hasn’t paid, the server refuses the request. This middleware layer sits between your network and your business logic, ensuring that only validated transactions reach your KYC/AML verification endpoints.
Think of this layer as the bouncer at the club door. It doesn’t care who you are or what documents you hold yet; it only cares if you’ve paid the cover charge. Once the payment is verified, the bouncer lets you in, and the KYC/AML logic inside can do its actual work. Without this foundation, your compliance checks are exposed to free-riders and automated abuse.
We will walk through the setup process using the Coinbase Developer Platform (CDP) as our reference, since it provides the most straightforward implementation for x402-gated endpoints. This guide focuses on the technical wiring required to make the 402 response trigger correctly before any sensitive data is processed.
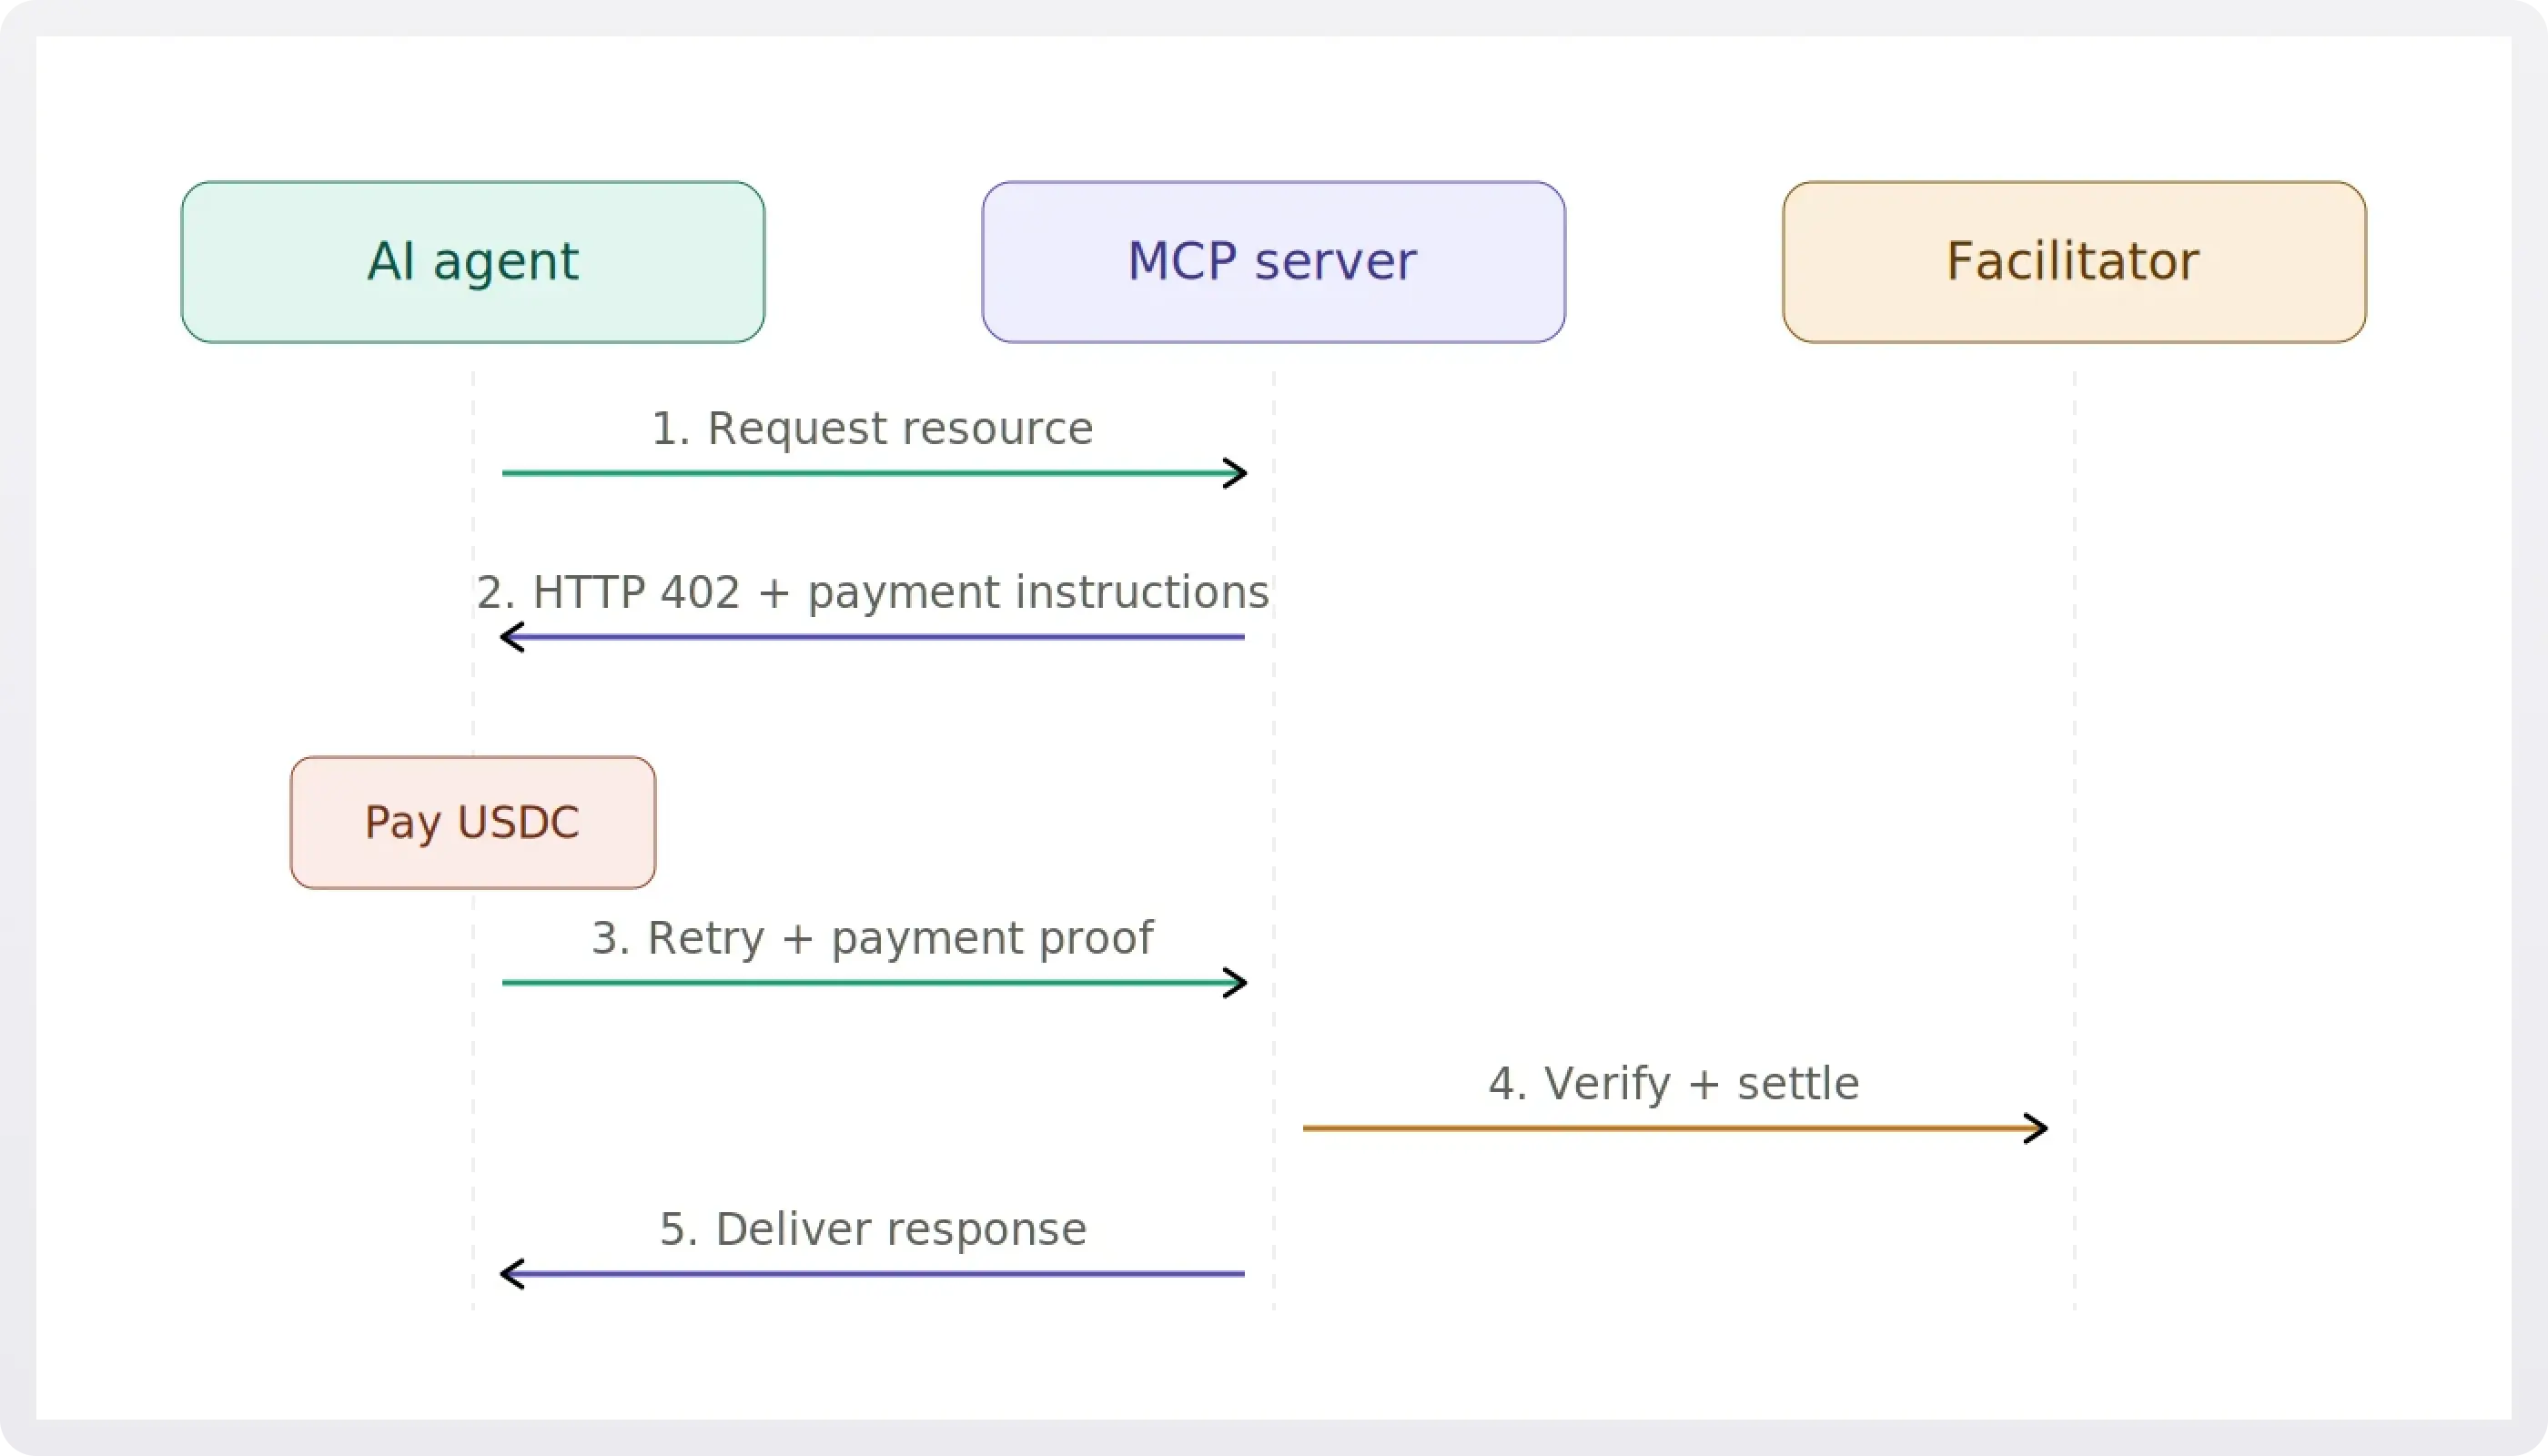
Start by adding the necessary SDKs to your project. If you are using Node.js, install the @coinbase/coinbase-sdk package. This library handles the cryptographic signing of payment requests and validates the payment proof sent by the client. Ensure your environment is set up to handle the required dependencies, such as axios for making HTTP requests to the payment gateway.
Next, configure your payment gateway to recognize your endpoint as x402-enabled. This involves setting up a PaymentConfig object that defines the price, currency, and the specific route that requires payment. You must also set up a webhook listener to receive real-time notifications when a payment is confirmed. This ensures your system doesn’t block requests prematurely or allow access before the transaction is fully settled.
Create a middleware function that intercepts incoming requests to your KYC/AML endpoints. This function should first check for a valid payment proof in the request headers. If the proof is missing or invalid, the middleware must return an HTTP 402 status code with a JSON body explaining the required payment amount and how to pay. Do not proceed to the KYC logic at this stage; the payment check is the gatekeeper.
Once a valid payment proof is received, verify it against the blockchain or the payment provider’s API. If the payment is confirmed, attach the payment metadata to the request context and pass control to your KYC/AML verification logic. This is where you can now safely access sensitive user data, knowing that the access was compensated and the transaction is immutable.
By following these steps, you establish a robust payment layer that secures your compliance endpoints. This setup ensures that your KYC/AML checks are not only legally compliant but also economically sustainable, protecting your infrastructure from unauthorized access while ensuring fair compensation for your services.
Integrate KYC Verification Logic
Connecting your x402 payment endpoint to a KYC service turns a simple transaction channel into a compliant onboarding flow. Instead of processing payments blindly, your endpoint acts as a gatekeeper, validating identity before funds move. This integration ensures that every token transfer is backed by verified user data, satisfying both regulatory requirements and platform trust.
The integration follows a clear sequence: collect, verify, and record. Your endpoint receives the user’s identity payload, forwards it to the verification provider, and waits for a status response. Only upon a successful match does the endpoint use the payment capability. If the verification fails or times out, the transaction is halted, and the user is prompted to correct their information.
Step 1: Collect Identity Data Securely
Before sending data to any provider, you must gather the necessary identity fields. This typically includes full legal name, date of birth, government-issued ID number, and a selfie for biometric matching. Ensure your form uses HTTPS and encrypts sensitive fields at rest. Never store raw biometric data on your own servers unless you have specific compliance certifications; instead, prepare the data for immediate transmission to the KYC provider.
Step 2: Call the Verification API
Once the data is collected, your backend sends a POST request to the KYC provider’s verification endpoint. Include the user’s unique ID and the collected documents in the request body. Most providers offer an asynchronous workflow, meaning you receive an immediate acknowledgment and a job ID, rather than an instant pass/fail result. This prevents your x402 endpoint from hanging while waiting for manual or AI-driven review.
Step 3: Handle Webhooks and Status Updates
Since verification is often asynchronous, your endpoint should not block on the initial request. Instead, configure a webhook listener on your server to receive status updates from the provider. When the KYC service completes its check, it sends a webhook to your specified URL with the result (e.g., approved, rejected, needs_review). Your backend then updates the user’s profile status in your database.
Step 4: Gate Access Based on Verification
Finally, update your x402 payment logic to check the user’s verification status before authorizing any transaction. If the status is approved, proceed with the token transfer. If it is pending or rejected, deny the payment and return an appropriate error code to the frontend. This ensures that only verified users can interact with your payment endpoints, reducing fraud and regulatory risk.
Step 5: Log and Audit Trail
Maintain a secure, immutable log of every verification attempt. Record the timestamp, the user ID, the provider’s response, and the final decision. This audit trail is critical for compliance reporting and dispute resolution. If a regulatory body questions a transaction, you can prove that the identity was verified at the time of the payment.
| Provider | Avg. Latency | Global Coverage | Integration Complexity |
|---|---|---|---|
| Trulioo | < 2s | High | Medium |
| Onfido | < 1s | High | Low |
| Jumio | < 3s | Medium | Medium |
| Sumsub | < 2s | High | Low |



As an Amazon Associate, we may earn from qualifying purchases.
Validate compliance before triggering
You are building an endpoint that handles sensitive identity data. If you serve that data before confirming the user is cleared, you are not just making a logic error; you are potentially facilitating financial crime. The x402 protocol handles the payment, but it does not handle the legal gatekeeping. That responsibility sits entirely on your implementation of the compliance check.
Your endpoint needs a strict verification gate. This is not a suggestion box; it is a hard stop. Before you process the x402 payment token or return any KYC/AML status, you must query your compliance provider to confirm the user’s current standing. If the status is anything other than "verified" or "cleared," the endpoint must return an error immediately. Do not proceed to the next step in the workflow.
This logic mirrors the standard Customer Identification Program (CIP) and Customer Due Diligence (CDD) steps required by regulators like FinCEN and the EU’s AMLD [1]. Skipping this verification is akin to handing over a house key to someone who hasn’t shown a valid ID. The cost of failure is not just a failed transaction; it is regulatory scrutiny and potential multi-million euro fines [2].
Implement this check as a synchronous validation step in your middleware. If the compliance API returns a delay or timeout, treat it as a failure. It is better to reject a legitimate user temporarily than to expose your system to illicit funds. Your code should look for a clear "pass" signal from your KYC provider before allowing the x402 payment flow to complete.
[1] Thomson Reuters, "5 essential steps for KYC/AML onboarding and compliance." [2] Sumsub, "AML/KYC Compliance Guide for Fintech 2025."
Generate and return the payment token
Once the KYC/AML verification succeeds and the client satisfies the x402 payment requirement, the final step is issuing the access token. This token serves as the cryptographic proof that the user has paid for the specific resource and passed the compliance check. Without this signed token, the protected endpoint remains locked, regardless of the user’s identity verification status.
1. Construct the JWT Payload
Start by building a JSON Web Token (JWT) that binds the payment event to the verified identity. The payload must include:
sub: The unique identifier of the verified user.iat: The issued-at timestamp.exp: The expiration time, typically short-lived (e.g., 15–30 minutes) for high-stakes compliance workflows.kyc_status: A flag confirming the user passed the AML/KYC check (e.g.,"approved").payment_ref: The transaction ID or hash of the x402 payment, linking the token to the specific payment event.
2. Sign the Token
Use your server’s private key to sign the JWT. The algorithm should be RS256 or ES256 for maximum security. This signature ensures that the token cannot be forged or altered by clients. Store the public key in a well-known endpoint (e.g., /.well-known/jwks.json) so that downstream services can verify the token’s authenticity without needing direct access to your private keys.
3. Return the Token to the Client
Respond to the client with the signed JWT in the Authorization header format: Bearer <token>. The client should store this token securely (e.g., in memory or an HTTP-only cookie) and include it in all subsequent requests to the protected resource. If the token expires or the payment reference is invalid, the server should reject the request with a 401 Unauthorized or 403 Forbidden status.
4. Validate on Protected Endpoints
Every protected endpoint must verify the JWT before processing the request. Check the signature, expiration, and kyc_status claim. If any check fails, deny access immediately. This ensures that only users who have both paid and passed compliance checks can access sensitive data or services.
Verify security and compliance standards
Before you deploy, you need to ensure your x402 endpoint doesn’t just work, but works within the law. Regulatory fines for AML/KYC non-compliance are no longer theoretical risks; they are multi-million euro liabilities under EU regulations. Your implementation must reflect that gravity.
Start by mapping your data flow against current AML/KYC best practices. You are handling sensitive identity data, so encryption in transit and at rest is non-negotiable. Ensure your KYC provider’s API responses are logged securely but stripped of PII where possible. This minimizes your liability if a breach occurs.
Next, validate the settlement logic. Your x402 endpoint should only release crypto or grant access after the KYC check returns a definitive "pass." If the check fails, the endpoint must deny the request immediately. Test this with edge cases: expired IDs, mismatched names, and network timeouts. A robust endpoint handles failure gracefully, not with a generic error that leaks system details.
Finally, run a compliance audit checklist. Verify that you are collecting the minimum necessary data (data minimization principle) and that you have a clear retention policy. If you store KYC documents, ensure they are encrypted and accessible only to authorized compliance personnel. This isn’t just about code; it’s about legal defense.
-
Encrypt all KYC data in transit and at rest
-
Verify endpoint denies access on KYC failure
-
Implement data minimization and retention policies
-
Log compliance events without storing PII
-
Test edge cases: expired IDs and network timeouts
Common questions about x402 KYC
Developers building x402 endpoints often need to translate regulatory requirements into API logic. Here are the answers to the most frequent questions about KYC stages and provider selection.
What are the 5 stages of KYC?
KYC is not a single check but a lifecycle. The five standard stages are:
- Customer Identification Program (CIP): Collecting basic identity data.
- Customer Due Diligence (CDD): Assessing risk based on that data.
- Enhanced Due Diligence (EDD): Deepening the check for high-risk profiles.
- Ongoing Monitoring: Watching transactions for suspicious patterns.
- Record Keeping: Storing evidence for audits.
Who are the top KYC providers?
The "top" provider depends on your integration needs. Major players include:
- Onfido: Strong for document verification and facial biometrics.
- Jumio: Offers global coverage and identity verification.
- Sumsub: Provides a flexible verification stack.
- Trulioo: Specializes in global identity data aggregation.
- Chainalysis: Essential for crypto-specific AML checks.
What is an end-to-end KYC process?
An end-to-end process moves a user from sign-up to approved status. It starts with data collection, moves through automated screening, handles manual reviews if flags appear, and ends with a compliance decision. Your x402 endpoint should handle the status callbacks from this flow.
No comments yet. Be the first to share your thoughts!